Avenger 3 Pro manual
Thank you very much for trusting our products and purchasing Avenger 3 Pro.
We will be grateful if you tag us on social media using the hashtags:
#vladbladirons and #avenger3pro, as well as mention our Instagram account - @vladbladirons
NEEDLE CLAMP
STERILIZATION
Use napkins and cotton buds to clean the machine.
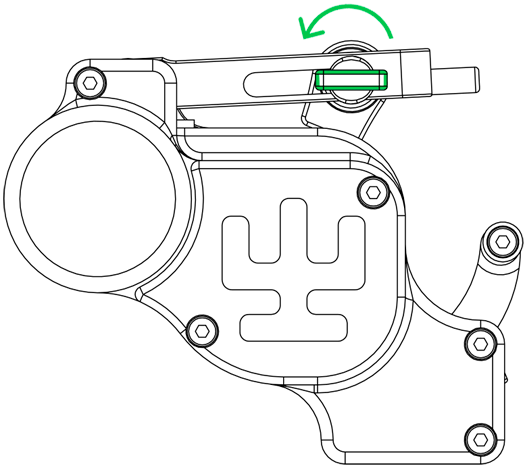
DO NOT run the machine without tightening the Multistroke screw.
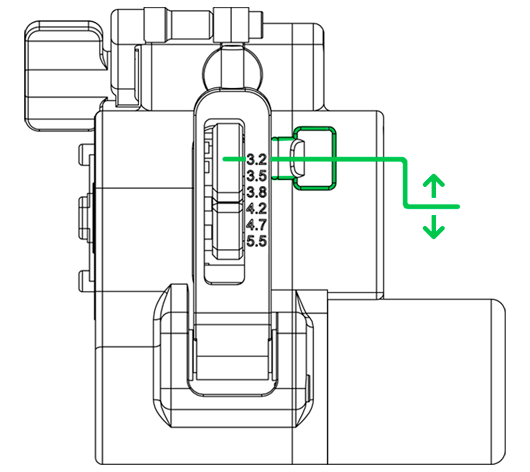
DO NOT try to tighten or work with the Multistroke screw in between the marks.
DO NOT unscrew the MultiStroke system screw all the way or a part of the system will fall out. If it falls out, insert it back in and tighten the screw.
DO NOT press the needle clamp too hard! Pressing too hard dampens the sharpness of the impact, reduces the power of the machine and quickly consumes battery power. It is not necessary to use the clamp to work with cartridges.
DO NOT use water–based disinfectant solutions for sterilization - this will lead to corrosion.
DO NOT try to sterilize the machine in an autoclave or a dry heat sterilizer – this will disable your machine and make it unsuitable for repair.
CONTROLS
1) Pressing the center button briefly turns the motor on and off;
2) Use the left button to decrease the speed of the motor;
3) Use the right button to increase the speed of the motor;
4) Pressing the center button longer (2 seconds) switches between the operation speed memory slots;
5) Pressing the central button for a long time (10 seconds) enters the menu.
START-STOP FUNCTION
The motor automatically turns off after 15 or 30 seconds if the machine is stationary and automatically turns on when it is lifted off the table.
This function can be disabled or the time before switching off can be changed between 15 and 30 seconds in the Start-stop menu item. To do this, you need to enter the menu by long pressing the central button (10 seconds), an information page will be displayed, and after 3 seconds the Start-stop time settings page will be displayed. Right-click to adjust the desired value. To exit the menu, press the left button, the setting will be saved automatically.
The machine does not have a shutdown function with a button and automatically turns off after 2 minutes of inactivity.
DO NOT store the machine with a fully discharged battery – this negatively affects the battery life.
You can use Li-Ion 18500 batteries purchased independently with the machine.
We recommend purchasing PANASONIC batteries, model
NCR18500A.
DO NOT store the machine at temperatures above 45 °C (113 °F) – this negatively affects the battery life.
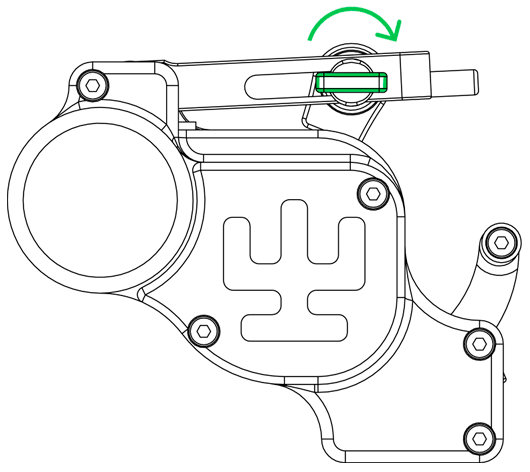
MULTISTROKE
Always tighten the Multistroke screw completely, otherwise it may break. If you hear noise during operation, be sure to tighten this screw.
WARRANTY
or read it below!
- We provide a one-year warranty.
- The warranty applies to the battery ONLY in case of loss of battery capacity by more than 20% for 1 year of use*
- This machine has been built to show the manufacturer if it has been opened or modified in any way. In this case the warranty will be void.
- If you purchased the machine from our distributors, please provide the receipt or the warranty card in any form to get the warranty service.
- In case of any trouble contact us via Instagram - @vbi_support or via e-mail - quality@vladblad.com. We will be happy to answer your questions!
MENU OPERATION
1) Pressing the right button changes the setting;
2) The settings are saved and the menu is exited by pressing the left button.
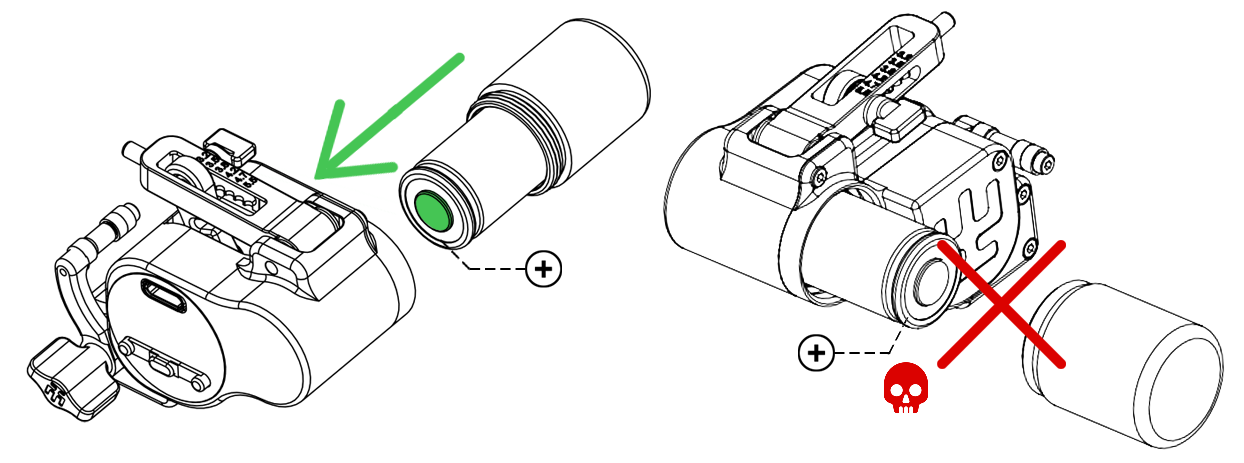
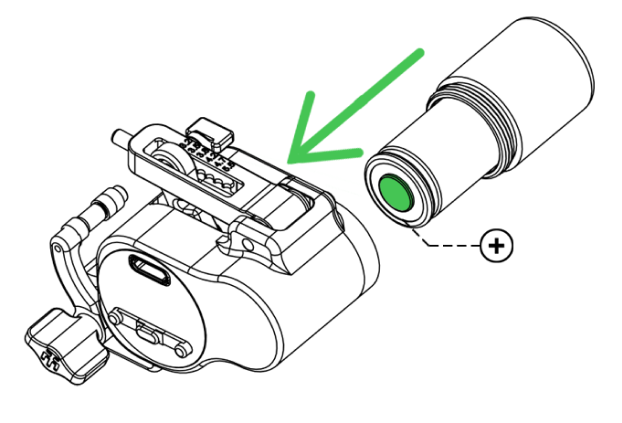
BATTERY
+ "plus" side (convex shape, smaller diameter) goes into the body of the machine;
- "minus" side (flat, larger diameter)
is covered by the removable lid.
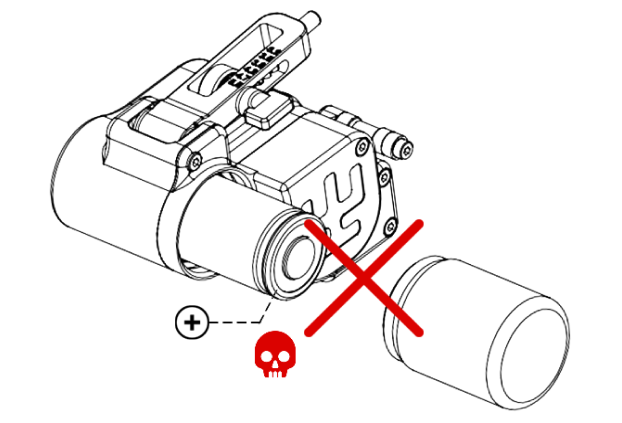
Always check the polarity when installing the battery into the machine! (see the pic.)
NOTE: If you hear an abnormal sound, stop the operation and check the tightness of the screw.
NOTE: The battery must be of an unprotected type (without built-in protection).
Use ONLY alcohol-based disinfection and sterilization solutions to protect components of the machine from corrosion.
DO NOT connect the charger to the machine if there is no battery in it!
1) Install the grip;
2) Insert a plunger bar or a standard tattoo needle;
3) Slightly tighten the clamp lock;
4) Lower the needle clamp so that the roller touches the plunger bar/needle;
5) Tighten the clamp lock to the end, while the clamp will also press the needle harder to the desired tension.
1. Loosen the adjusting screw 2-3 turns until the adjusting screw moves freely.
2. Move the screw so it is located opposite the number, indicating the desired needle stroke.
3. Tighten the screw down.
*The estimated loss of capacity (not guaranteed) under operating conditions is less than 15% for 2 years of use.
Incorrect position of the battery will cause breakdown of the machine!
NOTE: If your charged machine does not turn on by pressing the buttons or the motor does not start, remove the battery, check the cleanliness of the contacts (wipe them with alcohol if necessary) and install the battery back.